Adding Webpart using Client Object Model in SharePoint 2013
Have you ever had a deployed solution from one environment to other i.e Development to Staging or Staging to Production, so you have noticed that it requires lot of manual works to configure whole solution to work perfectly the way we have expected it to work. Consider a situation having a solution containing lot of webparts and we have to add them manually on pages, quite a cumbersome task and everybody hates to do it. So to cope up with these kind situations we can automate the process of adding webpart to a page. In this article I'm going to explain how to add webpart programmatically using CSOM.
Creating config file
To start the automation process first we need to create a configuration file, an excel or csv will do work.
This configuration file will store the data on which page which webpart need to be added with some other information.
Below the screenshot:

PageName: webpart page name.
ZoneId: Webpart zone name.
Order: Order of webpart in webpart zone.
LibraryName: SharePoint library name.
WebPartName: full name of custom webpart. You can get the full name(filename having .webpart extension) in feature.xml of webpart in solution.

PageName: webpart page name.
ZoneId: Webpart zone name.
Order: Order of webpart in webpart zone.
LibraryName: SharePoint library name.
WebPartName: full name of custom webpart. You can get the full name(filename having .webpart extension) in feature.xml of webpart in solution.
Creating function to add Webpart
In this step we are going to write some code using SharePoint Client Object Model for adding a custom webpart into a webpart
page. Now we are going to create a function AddWebPart that takes parameter from config file and
add webpart to the page.
First we need to get the client context of site which contains Pages library. You might need to pass the credentials to access the site. Here in this code I've _UserName and _Password global variables, you need not to make it global.

Once we have the client context of site, we will start fetching the webpart definition file from webpart gallery of Site. Below code uses CamlQuery class to query webpart gallery and fetch the matching file name. Once we call clientcontext.ExecuteQuery() method we have the reference of the .webpart file.

Now we have the .webpart file reference, we have to read the xml stored in that file for next step of adding webpart. We can simply read the xml using StreamReader class instance.

For adding webpart in a page we need the instance of LimitedWebPartManager from the page.

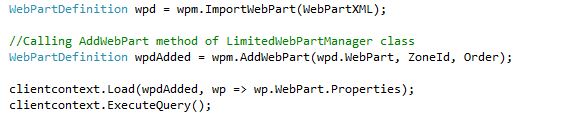
In next step, we are going to import the WebPartDefinition and then add the imported definition into the LimitedWebPartManager instance of page. Calling clientcontext.ExecuteQuery() method will add the webpart to the page.

Once we have webpart on page we can change the properties of webpart by upadting the values and apply the changes by calling SaveWebPartChanges method of WebPartDefinition class.

First we need to get the client context of site which contains Pages library. You might need to pass the credentials to access the site. Here in this code I've _UserName and _Password global variables, you need not to make it global.

Once we have the client context of site, we will start fetching the webpart definition file from webpart gallery of Site. Below code uses CamlQuery class to query webpart gallery and fetch the matching file name. Once we call clientcontext.ExecuteQuery() method we have the reference of the .webpart file.

Now we have the .webpart file reference, we have to read the xml stored in that file for next step of adding webpart. We can simply read the xml using StreamReader class instance.

For adding webpart in a page we need the instance of LimitedWebPartManager from the page.
In next step, we are going to import the WebPartDefinition and then add the imported definition into the LimitedWebPartManager instance of page. Calling clientcontext.ExecuteQuery() method will add the webpart to the page.
Once we have webpart on page we can change the properties of webpart by upadting the values and apply the changes by calling SaveWebPartChanges method of WebPartDefinition class.

Iterate through the config file and call AddWebPart method
Once you have this method your task is done. We just have to read the config file and pass values by repeatedly calling this method and you will have all your webpart pages populated with desired wbpart.
You can easily get the code to read config file, so I'm not going into the details. I've one class that reads Excel file into DataTable. From that I've read the data into dtPages DataTable and executed AddWebPart method by passing values from one row at a time.

You can easily get the code to read config file, so I'm not going into the details. I've one class that reads Excel file into DataTable. From that I've read the data into dtPages DataTable and executed AddWebPart method by passing values from one row at a time.

So now we have sorted out the problem of manually adding multiple webpart when are going to deploy solution from one environment to another. It's very useful during production deployment as we get very little deployment window and doing task manually may leads to error, also error found during Staging deployment will be addressed in automation part will eradicate to chances of error.
Complete function can be download from this link. Have a error free deployment.
Complete function can be download from this link. Have a error free deployment.


This comment has been removed by a blog administrator.
ReplyDelete